
Identify the Problem: Is Your Mirror Ball Joint Loose?
Have you ever experienced that heart-stopping moment when your rear view mirror starts dancing to the rhythm of your car’s bumps and hiccups? It’s a common tale, often signaling that the rear view mirror ball joint is getting loose. But before we dive into the fix, let’s figure out if it’s truly the ball joint causing trouble. Give your mirror a gentle wiggle. Does it have too much sway? If it feels like your mirror’s doing a solo samba every time you hit a pothole, we can confidently say that the ball joint may need tightening. The trick is diagnosing the looseness without resorting to a full-on mirror waltz.
Now, let’s talk about those Ford models—renowned for their sturdiness, yet not immune to the loose rear view mirror syndrome. When a Ford’s mirror starts to slack, it’s often down to a bump-loosened ball joint. And the thing is, this isn’t just about aesthetics or annoyance. A loose mirror could compromise safety, impairing your ability to see what’s happening behind you. So, tightening up that ball joint isn’t just a matter of convenience; it’s a priority for secure driving.
Tools You Need: Prepare to Tighten the Mirror Joint
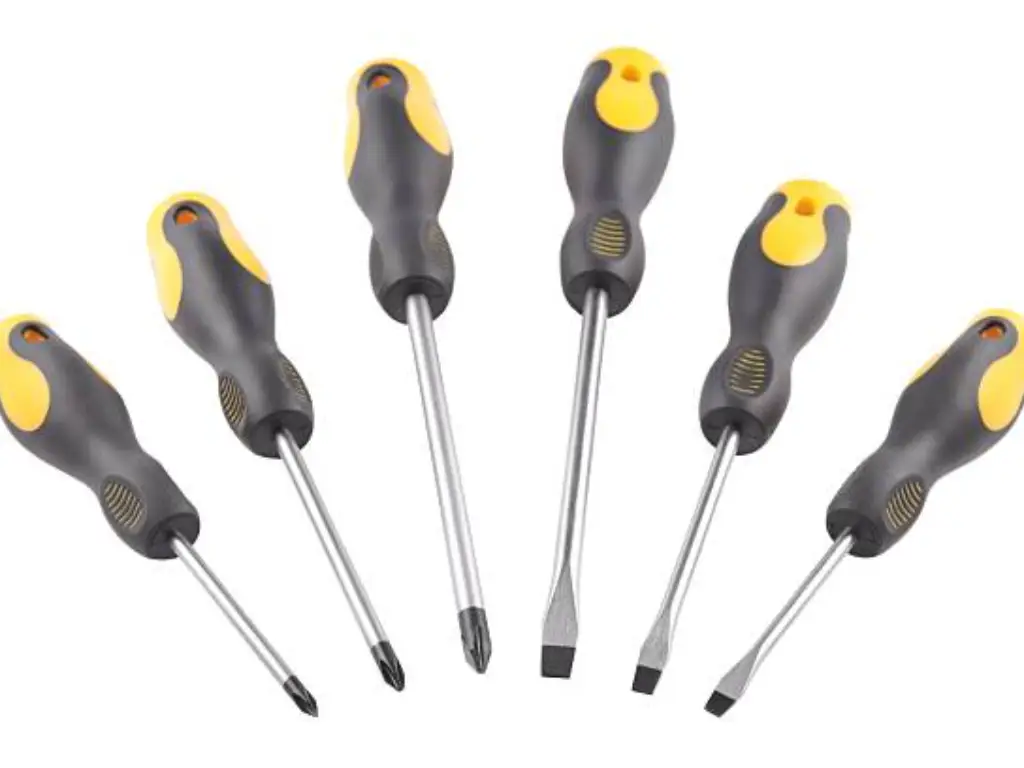
Embarking on the task of securing a rear view mirror necessitates a selective array of tools, eschewing the need for an extensive mechanic’s toolkit. The essentials comprise a Phillips screwdriver, potentially a Torx driver, a vial of thread locker, and, in some instances, adhesive tape. The initial step entails discerning the appropriate tool for your specific vehicle’s mirror. This is particularly crucial when addressing issues with a side view mirror, which may demand varied approaches. Typically, for numerous automobile models, a Phillips screwdriver is adequate.
| Tools Required | Purpose | Notes |
| Phillips Screwdriver | Primary tool for adjusting screws | Suitable for most automobile models |
| Torx Driver | Specific for certain models (e.g., Mini Cooper) | Necessary for unique screw types |
| Thread Locker | Secures the screw in place | Prevents loosening from vibrations |
| Adhesive Tape | Temporary holding/alignment | Used in specific adjustment scenarios |
However, dealing with unique models, such as addressing a loose Mini Cooper rear view mirror, might necessitate a Torx driver. Equipping yourself with the correct tools is paramount; it simplifies the task at hand while mitigating the risk of inflicting further damage. This process should be approached with the precision of a surgical procedure, where the selection of tools is as critical as the technique employed. Utilizing the appropriate tool is akin to choosing a scalpel over a more rudimentary instrument, ensuring a meticulous and successful adjustment of the rear view mirror ball joint.
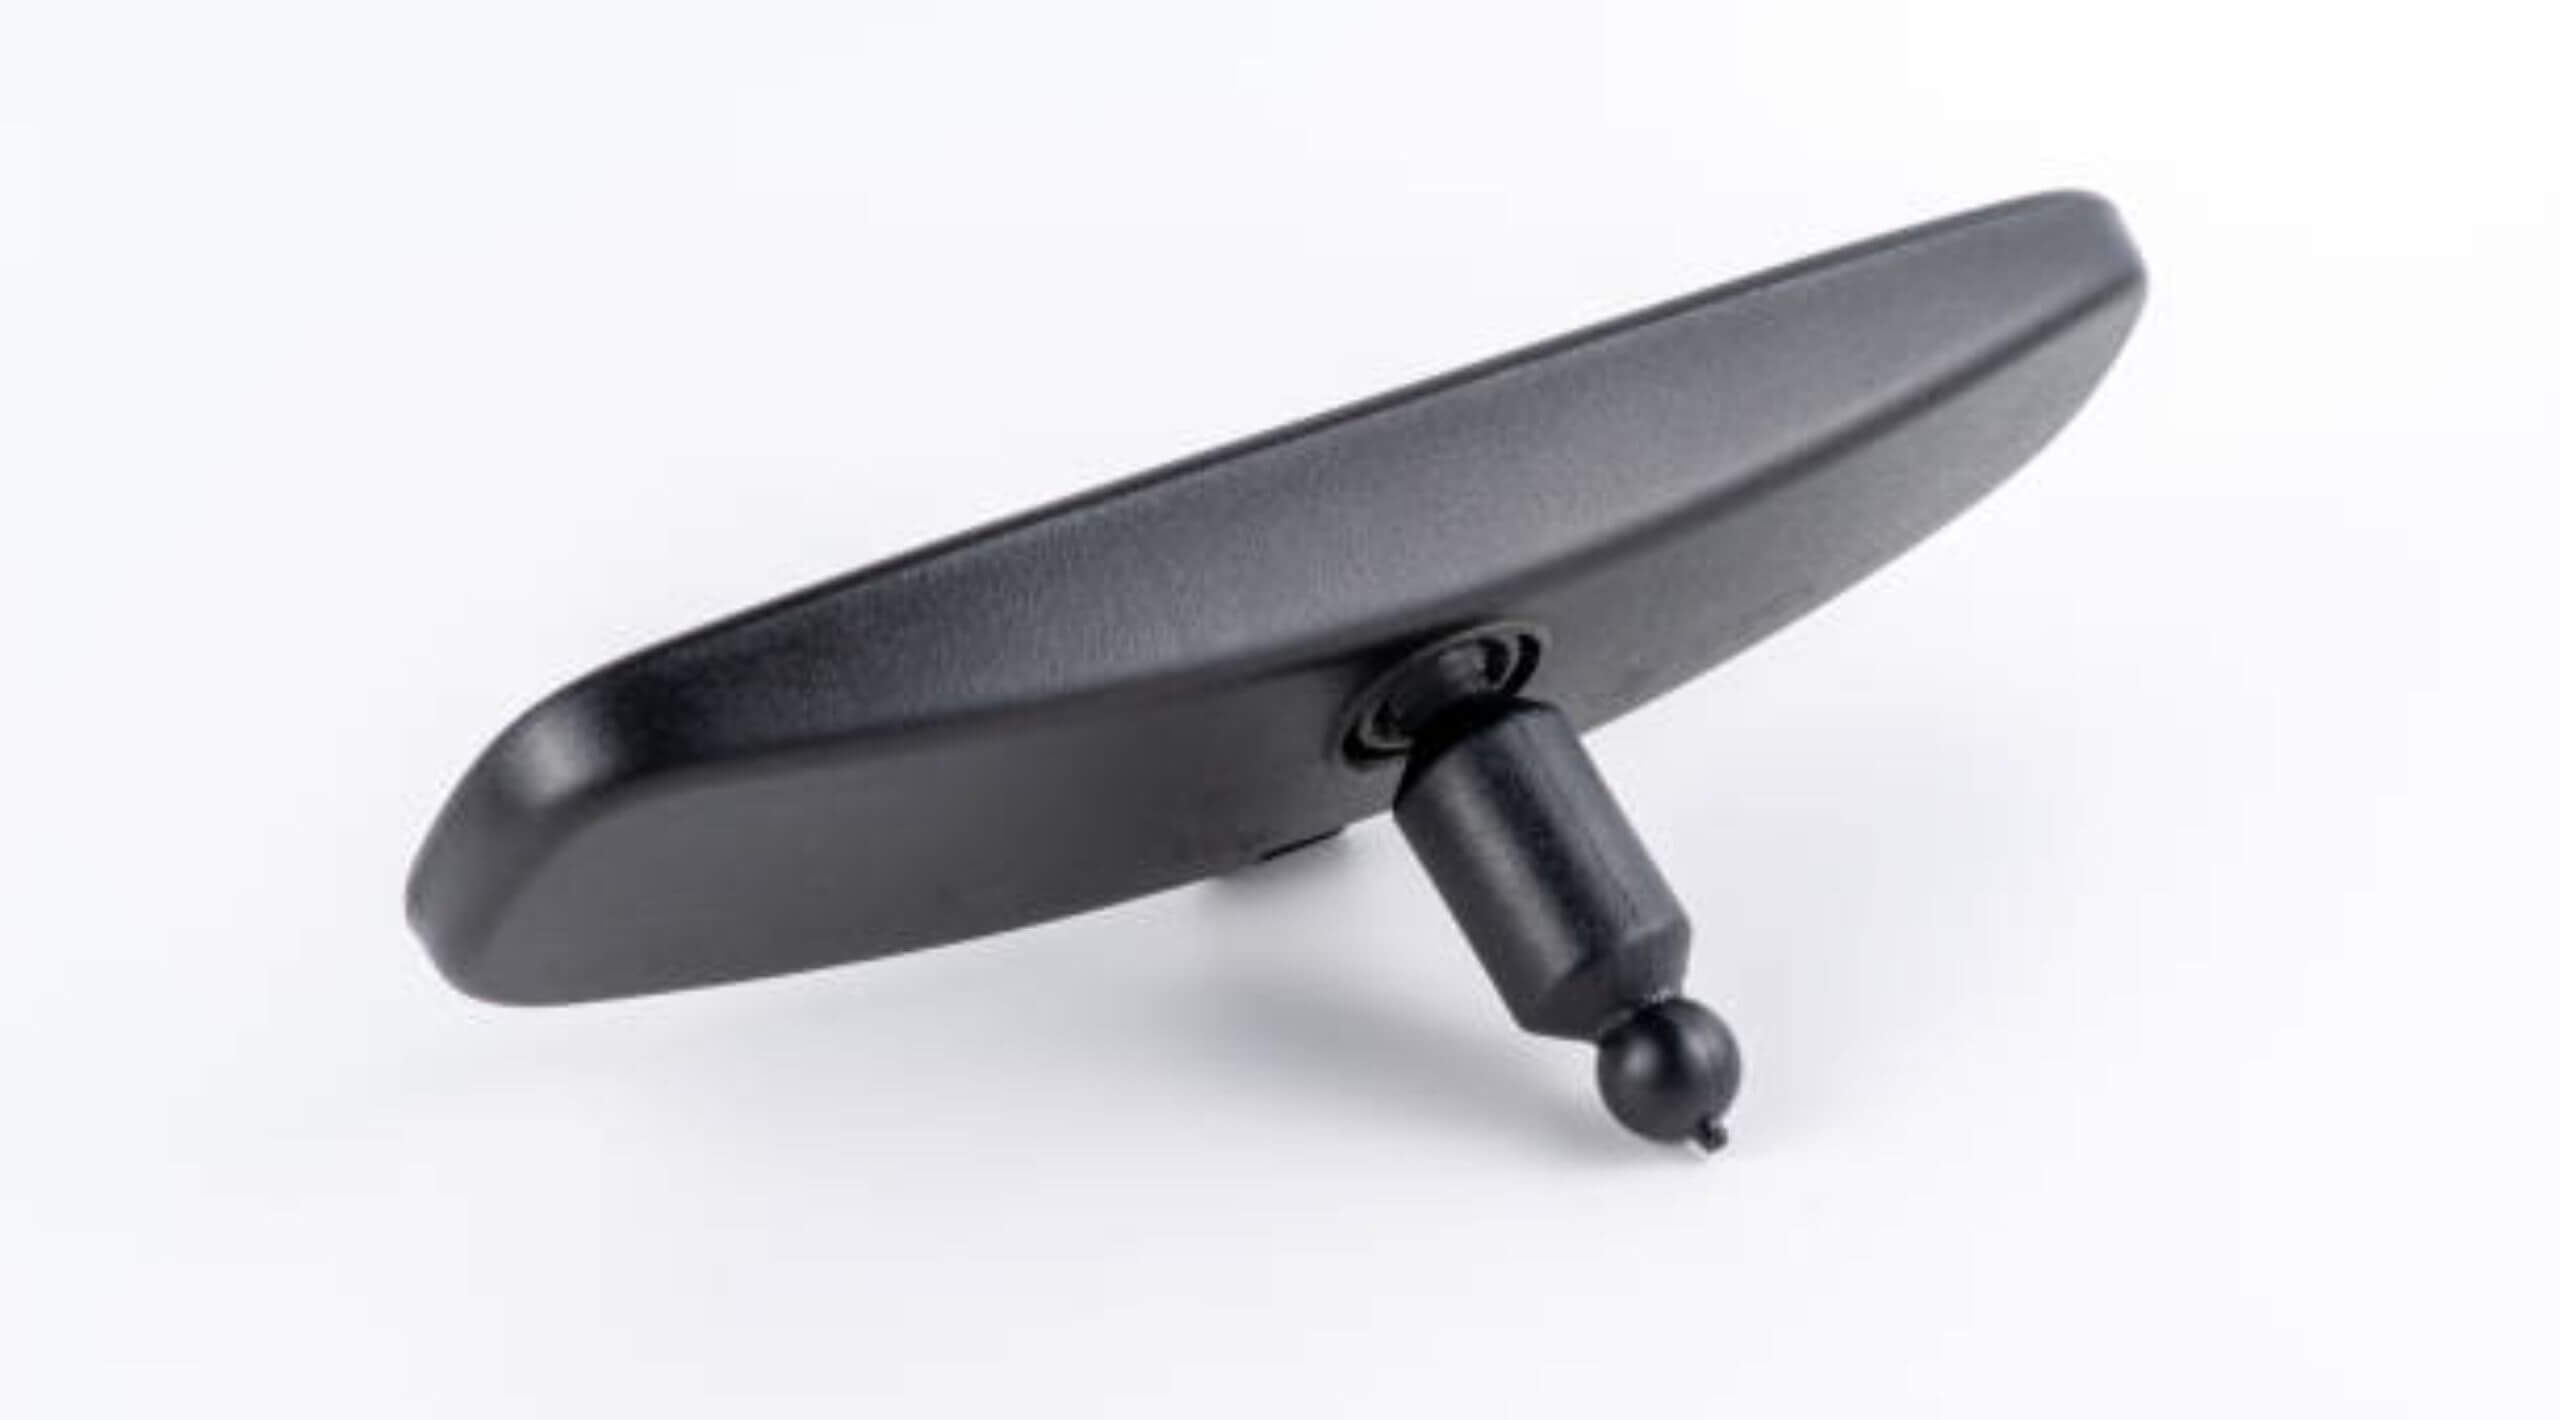
Step 1: Locate the Rear View Mirror Adjustment Screw
The initial phase in securing a rear view mirror necessitates a methodical approach, akin to investigative work. Your primary objective is to pinpoint the location of the rear view mirror adjustment screw. This component serves as the pivotal element for mirror stability, akin to a linchpin in its structural integrity. In a majority of vehicle models, this crucial adjustment mechanism is discreetly concealed behind a plastic cover. For specific cases, such as the Volkswagen rear view mirror detachment incident, the adjustment mechanism typically involves a diminutive set screw located directly behind the mirror panel. This stage marks the commencement of the practical aspect of “how to fix loose side mirror on car”.
Upon locating the adjustment screw, the temptation to overtighten might be strong. However, it is imperative to exercise restraint and precision. Overzealous tightening can be counterproductive, particularly when addressing delicate mechanisms such as the rear view mirror ball joint. A judiciously calibrated turn of the screwdriver can profoundly enhance the mirror’s stability, effectively countering the dynamic forces encountered during vehicular transit. This meticulous adjustment is crucial, ensuring the mirror’s resistance to the unpredictable forces encountered on diverse road surfaces.
Step 2: Tighten the Ball Joint with Precision
At this juncture, we approach the critical phase of our “how to fix rear view mirror ball joint” procedure. Having successfully located the elusive adjustment screw, the task now is to execute the tightening operation with meticulous precision. This process can be likened to the delicate art of tuning a musical instrument: over-loosening results in a lack of harmony, while excessive tightening risks structural compromise. A strategic adjustment, encompassing both turns and twists, is essential to establish a robust connection between the screw and the ball joint.

It is worth noting that certain vehicle models may present unique challenges in this endeavor. Instances involving a side mirror loose at the pivot point, or scenarios such as the “my side mirror is loose” predicament, demand a heightened level of finesse. The intrinsic simplicity of ball joint mechanics, which is also applicable to scenarios involving loose side view mirrors, belies its critical function. This component, while straightforward in its design, is integral to the mirror’s operational integrity. Achieving the correct tension is akin to perfectly tying one’s shoelaces: it assures both security and confidence in performance.
DIY Method: Secure Mirror Ball Joint Without a Screw
Imagine this: You’re all set to tighten the ball joint, and bam! No screw. Don’t panic—there’s a DIY fix for when your side view mirror loose woes can’t wait. Grab some strong adhesive—like a two-part epoxy or a specialized automotive adhesive—and let’s get crafty. The goal here is to create a new bond between the loose rear view mirror (swivel ball) and its housing. Carefully apply the adhesive around the joint, making sure not to overdo it. The last thing you want is glue on the mirror itself!
Here’s the trick, though: you need to hold the mirror precisely where you want it while the adhesive sets. Patience is key—and hey, a bit of ingenuity too. Maybe rig up a contraption with tape to keep it steady? It might look like you’re performing a strange science experiment, but if it holds the mirror in place, you’re golden. And remember, allowing the adhesive to cure fully is crucial for a lasting fix. This DIY solution can be as strong as traditional methods and gives “how to fix rear view mirror ball joint” a whole new twist.
Pro Tip: Testing Mirror Stability Post-Fix
Following the completion of the repair, a critical evaluation phase ensues. It is advisable not to embark on rigorous driving tests immediately. Commence with a subtle application of force to the adjusted mirror. Did it maintain its position? Should it falter, a reevaluation of the procedure is necessary. For those who have utilized adhesive solutions, it is crucial to allow the adhesive ample time to cure fully, adhering to the product’s specified guidelines. This step is particularly pertinent for instances such as the Volkswagen rear view mirror reattachment, or any other adhesive-based fixes. Ensure that the bond between the mirror and its support structure feels as resolute as your commitment to the task.
The test can be as elementary as a calm drive around your vicinity. Vigilantly observe the mirror’s stability during this trial (while maintaining road safety, of course). Should the mirror remain steadfast in its position, then congratulations are in order. You have successfully mastered the “how to fix rear view mirror ball joint” challenge. This accomplishment transcends the mere repair of a vehicular component; it represents the restoration of your confidence and tranquility while operating a vehicle. This sense of security, as you navigate the roads, is indeed invaluable.
Prevent Future Issues: Maintaining Mirror Joints
Maintenance, maintenance, maintenance! This can’t be stressed enough when it comes to “how to tighten a rear view mirror” and keeping it that way. Once you’ve gotten your rearview mirror back in top form, regular check-ups are key. This doesn’t mean obsessing over it every day but give it a quick check now and then—especially after a rough ride.
It’s not just the rear view mirror loose ball joint you need to be mindful of; keeping an eye on how the side mirror on the car feels can prevent future heartache. Look out for early signs of wear and take action before the whole thing goes south. A bit of preventative tightening and occasional cleaning to get rid of grime that could clog the mechanism could save you a heap of trouble. Consider it as routine as checking your oil; a little proactive care goes a long way.
Common Mistakes to Avoid When Fixing Mirrors
Now, let’s talk pitfalls. When grappling with how to fix a loose side mirror on a car, several missteps could turn a simple fix into a full-blown mirror mishap. Resist the urge to muscle your mirror back into place—you’re not Thor, and it’s not a hammer. Excessive force can turn “how to tighten rear view mirror” into “how to replace a shattered rear view mirror.”
Another classic oopsie? Neglecting the correct screwdriver size. Doing so could strip the screw, and nobody wants that. Also, keep thread locker at hand for screw-in types; this magical potion prevents screws from coming loose due to vibrations. Remember, an ounce of prevention is worth a pound of repairs. Take it easy, choose the right tools, and your side mirror loose conundrum will be a thing of the past.
Alternative Fixes: What If the Quick Fix Doesn’t Hold?
What transpires when conventional “how to fix rear view mirror ball” strategies fail to yield the desired outcome? In certain instances, a rear view mirror may defy the simpler methodologies of screw-tightening or adhesive application. When the ball joint is irrevocably worn, procuring a replacement part becomes a necessity. This is analogous to replacing the frayed laces of a cherished pair of sneakers with new ones, to restore functionality.
Furthermore, the predicament of a side mirror being loose at the pivot point warrants consideration. In scenarios where manual tightening proves futile, seeking replacement components from a reputable automotive parts supplier, either locally or via online platforms, becomes essential. For those finding the “how to fix loose side mirror on car” process perplexing, enlisting professional assistance is a pragmatic approach. Soliciting expert intervention is a commendable action, particularly when the complexity of the issue lies beyond one’s technical expertise.
Final Checks: Ensuring a Safe and Stable Rear View
Upon completing the repair process, it is imperative to conduct a series of final inspections to ensure the utmost safety and stability of your vehicle’s rear view. Prior to congratulating yourself on mastering the “how to fix a loose side mirror on car,” engage in a comprehensive review. This entails verifying that all tools have been appropriately stored and confirming the adequacy of the tightening process. A critical step involves a pragmatic road test, as certain issues may only become apparent under actual driving conditions.
The stabilization of both the rear view and side mirrors transcends a mere task completion; it fundamentally concerns the safety of all occupants within the vehicle. Achieving a secure and stable mirror alignment is crucial, as it directly affects the driver’s visibility and situational awareness. In the realm of vehicular safety, having a clear and unobstructed view of the rear environment is as critical as maintaining focus on the road ahead.
Summary
In summary, grasping “how to fix loose rear view mirror ball joint” can be a straightforward task with the right approach. From identifying the looseness to applying the fixes, and finally to the all-vital maintenance, it’s a journey with bumps (pun fully intended) along the way. Whether it’s a trusty Ford or a zippy Mini Cooper, the same principles apply. So, take a breath, grab your tools, and tackle that loose mirror with the confidence of a DIY guru. You got this!